Scrap Happy 2016

I’ve had to admit to myself that my ‘collection’ of both yarn and fabric has got a little bit out of control. Every project just adds to the boxes that adorn the spare room – but the thing that I kept coming back to (especially with the yarn) is that it’s all nice stuff, so I couldn’t bring myself to give it away. We’re talking lovely aran wool, bamboo double knit, pretty sock yarn, a random ball of something nice I’ve seen.

IMG_0675

It’s amazing how much I found when I started to look!

I’m not sure I was quite ready for how much yarn I was going to find when I started to look, but a cold damp Monday morning a couple of weeks ago I decided to look (I was procrastinating on a post-decorating tidying up chore, which funnily enough is what I’m still doing now!).

I was very happy with what I found – I’d already decided that anything artificial wasn’t going to make the cut, but apart from that it was the more the merrier. I’m not normally a rainbow sort of a girl, but how could I not with all these colours?

IMG_0676

I had two things to solve – how to use lots of miss matched weights of yarn, and second how to start a blanket with no idea how big it was going to end up.

To resolve the first I went for a 10mm hook and 3 strands of yarn – making it a very quick project to grow and using 3 strands of different weights means I’ve been able to balance things out across the blanket.

To sort out how to start a blanket when I had no real idea of how big it is going to get, I decided to use the corner to corner technique. I’ve used it a couple of times recently, and it meant I could just weigh the yarn (over 3kg!), divide it in half by weight and then I would know once I got to the half way point and need to start decreasing.

IMG_0686

The thing I’ve been most surprised about is how much I’m enjoying the project. It’s growing fast, it’s very, very warm to work on, in my mind the yarn is ‘free’, I’m making space in the spare room and the colours make my heart sing – what’s not to like?

Even though I’ve decided on a rainbow, I think because the colours are all natural fibres, and as the colour change is very gradual it’s not too over the top for me.

IMG_0693

I’m on a roll now with the scrap projects – I’ve got ideas about a new blind for my landing window made out of fabric samples, and maybe some wall hangings for my newly redecorated bedroom (the one that I should currently be tidying / sorting) inspired by these beauties on the purl bee website.

I wonder how far through the year I can get without needing to buy any new yarn / fabric…


JPx


Quick Baby Cow Quilt

P1010212

Happy Cows

An old friend of mine who’s living in Canada had a baby boy a couple of months back and I really wanted to send a ‘hello’ to the new arrival. So I diligently got out my crochet hooks, bought some yarn and started crafting a colour change blanket.  It took me a few weeks to make, but somehow it just didn’t work out very well.  So, I have to confess that ditched it in the ‘one to try later’ pile!

Which all means that I’m rather late in sending something across the pond, and for the sake of speed, and because I was grumpy about my first try, I decided to dust off the sewing machine again and try my hand at a VERY SIMPLE quilt.  Actually, Quilt may be overselling it slightly, but there we go.


Beautiful fabric

Beautiful fabric

Jo had already found this fabulous fabric in the blue version (blue background, not blue cows!), and when I saw this bright green version, I grabbed it and ran.

P1010215

Funky?


My sewing machine and I have had a bit of an up and down relationship in the past (entirely the sewing machine’s fault of course), but actually, it behaved rather well on this occasion.  I’ve literally just stitched vertical lines along the quilt, onto a white fleece backing, and then edged it in a darkish grey.  I really wanted something funky and fun and not too traditionally ‘baby’ for this  project and I think it’s come out pretty well apart from perhaps a couple of corners which need a little love and erm, hiding.  I’m still learning the art of quilt making (and corners), so it was good to do this one entirely by myself (yay me!).  My last attempt took a whole lot longer and needed a fair amount of input from Jo (see here).

P1010216

It’s back to crochet for me now – a couple of projects in the pipeline, including a trio of little baskets for my spare room…..

Karey x

Hoot Hat – Tunisian Crochet Owl Hat Mini-Tutorial


HootHat

So my daughter wanted an owl hat for the winter this year.  I’ve seen lots of lovely ones out and about, so I had a good idea of what kind of look I’d like to create.  Most important for me was the ‘sticky up’ ears bit.

I came across this lovely Rowan Baby Merino Silk Double Knitting yarn in my local yarn shop and decided I’d try out Tunisian crochet, which I’d been hankering after playing with for a while.  I stole borrowed a set of Tunisian crochet hooks from Jo (these ones have a long plastic ‘tube’ attached onto the end of a traditional bamboo crochet hook, so they’re ideal for wider projects), and set about learning this lovely style.  I followed an excellent tutorial here on The Purlbee website, which is super clear and simple to follow. The texture this basic stitch creates is really rather lovely.  I love the look of the vertical lines, and it’s dense without being rigid.

Version One - not quite chunky enough for my liking!

Version One – not quite chunky enough for my liking!


Version one didn’t work out to be quite what I was looking for – so I wrote it off as good Tunisian practice and went back to square one with this much chunkier Rowan yarn, Felted Tweed Chunky and I love it (although I have a feeling that Rowan have discontinued this specific yarn 😦 )

P1010027

Perfect Winter hat yarn


The pattern is very basic and goes something like this:

  • Yarn of your choice – I used 100g of this Rowan Felted Tweed Chunky
  • Tunisian crochet hook which is 1.5 – 2 sizes bigger than that suggested on the yarn band.


Measure the head of the soon to be occupant of the hat and add on an inch to allow for some wiggle room.  I found that the finished article tightened up a bit from the length of the base chain, so keep measuring before you get too far in, or make yourself a handy swatch.

The hat I made was 21inches long and 16 rows (forward AND return) high.

Fold the rectangle in half to make your hat shape and slip stitch together

Fold the rectangle in half to make your hat shape and slip stitch together

Once finished, I had a lovely rectangle measuring 21inches long by 7.5 inches high.  The height here includes the small ‘curled up’ section at the bottom. At this point, it was simply a matter of joining the two short edges together using slip stitches to create a cylinder.  I then re-shaped the cylinder and squashed it flat so that the join would be in the middle of one of the sides (which would become the back of the hat) and then slip stitched along the top.


Lovely tassel-y ears

Lovely tassel-y ears

At this point, I added the ears, or tassels.

They’re very quick to make – there’s a picture tutorial here on Pinterest that shows you how. I’ve just pulled the strands of the chunky yarn apart to make the tassels more fluffy, and then sewed them in place.

P1010030

Smaller eyes were ditched for the bigger, orange rimmed version


Making the owl features

I’d already tried some smaller eyes, but Jo rightly pointed out that owls eyes are supposed to be big (doh!) – so version two of the owl eye was born.  It goes like this (make 2!) – using UK crochet terms:


Round 1 – Using a black / grey yarn make a magic circle and make 6 double crochet into the ring. Join with a slip stitch (6)

Round 2 – Chain 1, then 2 double crochet into each stitch from the round below (12)

Round 3 – Change to a white yarn. Chain 1, then *1 double crochet into next stitch, 2 double crochet increase in next stitch*. Repeat from * to * five more times (18)

Round 4 – 2 DC *2DC inc, 2 DC* repeat from * to* 5 times, 2DC inc (24 DC in total); (24)

Round 5 – *2DC inc, 3DC* repeat from * to * 6 times (30 DC in total)

Round 6: 3DC *2DC inc, 4DC* repeat from *to* 5 times, 2DC inc, 1DC (36 DC in total)

Round 7: – Change to orange yarn – *2DC inc, 5DC* repeat from *to* 6 times (42 DC in total)

(You’ll notice I haven’t used the traditional flat circle system for these eyes, as I find that it makes for more of a hexagonal shape – for more details on staggering where the increase goes, see Jo’s Twercle tutorial here).

Sew in ends


Beak

Row 1 – Chain 8

Row 2 – DC in 2nd chain from hook and DC in each, chain 1 and turn (7)

Row 3 – DC in each, chain 1 and turn (7)

Row 4 – 2DC decrease, 3 DC, 2DC decrease, chain 1 and turn (5)

Row 5 – DC in each, chain 1 and turn (5)

Row 6 – 2 DC decrease, 1 DC, 2DC decrease, chain 1 and turn (3)

Row 7 – DC in each, chain 1 and turn(3)

Row 8 – 3DC decrease (ie. hook through, yarn over into first, second and third stitches, until you have four loops on your hook, then yarn over and pull through all of them together.

Now DC all the way round the triangle you have created, inserting 3D at each corner.

Sew in ends.

P1010037


Now it’s simply a case of sewing all of the features in place and voila – such a quick and easy hat to make.  I’m delighted with it.

P1010046

Finished Owly face


Let me know any thoughts you have.  Happy hooking.


KareyP1010101

My Annual Need to Knit

I come from a family of knitters, The Old Bat knits, my sister knits, my step-mum knits, even my Dad was taught to knit as a child (as part of the physio care when he fell out of a tree and broke both arms!).

Attempt by The Old Bat to teach me to knit as a child were always something of a disaster. Perhaps not helped by the fact that she’s left handed and I’m not, and coming from a long line of german knitters I was being taught to knit the continental way (you hold the yarn in your left hand, wrapped around your finger which is held up in the air). I tested The Old Bat’s patience and she tested mine.

Last year's ball was a very plain one, but I love the feeling of snowball it has.

Last year’s ball was a very plain one, but I love the feeling of snowball it has.

A couple of years back I decided that with parental help a couple of hundred miles away, it was safe to have another go at knitting. Working on the ‘how hard can it be’ basis, I trotted into town bought a book, needles and yarn and was determined to tackle my lack of knitty ability. Now, whilst I can happily say that I can knit (and true to family tradition, I do knit yarn in left hand, finger dutifully in the air) crochet remains my favorite and my best apart from when December starts to creep around.

Please excuse the paint splattered hands!

Please excuse the paint splattered hands!

As the evenings draw in and the John Lewis add starts to appear on the telly-box the urge to knit takes over – during my ‘I’m going to bloody well learn to knit’ phase, I bought these books by Arne and Carlos.  I love them both, I love the pictures, the designs, the cosy idea that if we knit like mad and decorate our homes with enough knitted goodies all will be well with the world. For me they have become part of the run up to Christmas, along my log burner,  getting out my copy of Nigella Lawsons ‘ Christmas’ book and filling the little pockets in the kids advent calendars.

IMG_0575

I love both of these books by Arne and Carlos


My collection of knitted balls is slowly growing, anything ski / mountain related always goes down well in this house, so these were the first two I made.

DSC_5286

Snow on the trees – makes me look forward to skiing even more….


I’m pretty sure that some of the colour changes wouldn’t stand up to close inspection, but that’s the joy of these little balls – it doesn’t matter, a little mistake on a christmas ball just adds to it’s homemade character. In amongst the chaos, food and wine that make up the festive season in our house, no one is going to notice anyway.

DSC_5289

Mr Skier


This year I’m opting for the easy choice of stripes and playing around adding beads – I’m using up the yarn from my breaking waves cushion because even the scraps are just too lovely to be left in the bottom of my wool basket. Also because we’re in the midst of a decorating project at home at the moment  when I do get the chance of a cup of tea and a sit down (sitting carefully on an old blanket as I am the messiest painter and decorator known to man) I need some crafty creativity that is easy on my decorating addled brain (too many paint fumes maybe?).

This year I'm playing around adding beads.

This year I’m playing around adding beads.

I think three of these lovelies will be perfect, then I can put my knitting needles away for another year and get back to the serious business of crochet!!

JPx

Even Jerry the cat likes the Arne and Carlos book.....

Even Jerry the cat likes the Arne and Carlos book…..

Breaking Waves Crochet Cushion Tutorial


Rowan_Breaking_Waves_Cover


I love a trip to the seaside, and perhaps even more than Summer sunshine and ice cream trips, it’s the winter blow-away-the-cobwebs days I enjoy the most. It’s those kind of trips that have inspired this cushion – in my mind, it’s not tropical breaking waves, it’s good wintery, chilly English breaking waves on those precious days of the winter when the sun breaks through the clouds and the waves crash on the beach.

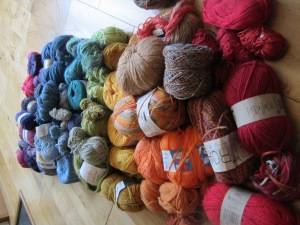
I’ve made this cushion using Rowan Felted Tweed, the colours are perfect for what I had in mind and as it’s 50% Merino Wool, 25% Alpaca and 25% Viscose it is a joy to work with.

I’d just like to say, as you’ll see if you scroll down this pattern has turned into a bit of an epic! I’ve made every effort to ensure that the instructions are correct and added diagrams and photos to help. However, if you do need any pattern support or clarification, just drop me a note (info@craftsandcofee.co.uk) and I’ll be happy to help!

To make this cushion you will need:

Rowan Felted Tweed
Seasalter (178) 50g
Scree (165) 150g
Maritime (167) 150g
Duck Egg (173) 150g
Clay (177) 50g

4mm Crochet Hook

7 Medium sized buttons

2mm clear glass beads (optional)

20 inch cushion pad

tapestry needle

This pattern is written using UK crochet terms.

Tension: On the cushion front horizontally from the peak of one wave to the next should be 8cm, and vertically 8cm is equal to 7 rows.

Cushion Front

The front of the cushion is a simple wave pattern made in treble crochet.

key and chart

Starting in Scree (165) work 102 chain.

In 5th Chain from hook (the 4 chain count as one double treble)  work 1 treble, then working along the chain work ,3 half treble, 4 double crochet, 3 half treble, 1 treble, 1 double treble.

Continue to work across the chain with the pattern *1 double treble, 1 treble, 3 half treble, 4 double crochet, 3 half treble, 1 treble, 1 double treble* repeat from * to * 5 more times.

Row A: 3 chain, turn work, and working in back loops only for the entire row work 1 treble in the back loop of the final double treble from the first row (effectively forming a 2 treble crochet increase). Then work 4 treble crochet, two 2 treble crochet decrease, 4 treble crochet, one 2 treble crochet increase.

Continue to work across the row with * one 2 treble crochet increase, 4 treble crochet, two 2 treble crochet decrease, 4 treble crochet, one 2 treble crochet increase* work from * to * 5 more times. Please note, the final 2 treble crochet increase will be worked into the back loop of the initial 4 chain. This is the right side  of the work.

Row B: 3 chain, turn work, working in front loops only for the entire row  work 1 treble in the back loop of the final double treble from the first row. Then work 4 treble crochet, two 2 Treble crochet decrease, 4 treble crochet, one 2 Treble Crochet increase.

Continue to work across the row with * one 2 treble crochet increase, 4 treble crochet, two 2 treble crochet decrease, 4 treble crochet, one 2 treble crochet increase* work from * to * 5 more times. This the back of the work.

Continue to work the cushion front following Rows A & B above – when the right side of the work is facing you, work in the back loops. When the back of the work is facing, work in the front loops.

P1000481

The wave pattern is formed and on the right side of the work the front loops of each row are available for us to work the waves into later

The colours should be worked as follows:

IMG_1615

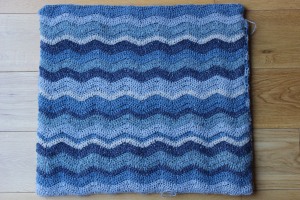
Here are the colours of the rows for the cushion front.

Bottom Row: Scree (165)
Row1: Scree (165)
Row 2: Scree (165)
Row 3: Maritime (167)
Row 4: Maritime (167)
Row 5: Seasalter (178)
Row 6: Duck Egg (173)
Row 7: Duck Egg (173)
Row 8: Duck Egg (173)
Row 9: Seasalter (178)
Row 10: Seasalter (178)
Row 11: Clay (177)
Row 12: Maritime (167)
Row 13: Scree (165)
Row 14: Scree (165)
Row 15:  Duck Egg (173)
Row 16: Duck Egg (173)
Row 17: Seasalter (178)
Row 18: Maritime (167)
Row 19: Maritime (167)
Row 20: Maritime (167)
Row 21: Clay (177)
Row 22: Scree (165)
Row 23: Scree (165)
Row 24: Scree (165)
Row 25: Seasalter (178)
Row 26: Seasalter (178)
Row 27: Duck Egg (173)
Row 28: Duck Egg (173)
Row 29: Maritime (167)
Row 30: Maritime (167)
Row 31: Seasalter (178)
Row 32: Seasalter (178)
Row 33: Clay (177)
Row 34: Duck Egg (173)
Row 35: Duck Egg (173)
Row 36: Duck Egg (173)
Row 37: Scree (165)
Row 38: Scree (165)
Row 39: Maritime (167)
Row 40: Maritime (167)
Top Row: Maritime (167)

Normally I wouldn’t go so far in a pattern like this to suggest row by row which colours you should use. However, as the Rowan yarn is quite expensive (and therefore if you’re like me you might not want to buy an extra ball if you run out!) if you follow the rows as above and your tension is the same as mine (detailed above) you’ll have enough yarn left of each colour to work the detailing on the front of the cushion.

Once you have worked 40 rows of waves, using Maritime (167), 1 chain (does not count as first double crochet) and turn work. Work back across the row *2 double crochet, 3 half treble, 1 treble, 2 double treble, 1 treble, 3 half treble, 2 double crochet* repeat from * to * 6 more times. Cut yarn and fasten off.


P1000483

You will now have a square of waves onto which we’re going to work the detail of the raised waves from the top down as follows:

On some of these raised waves I’ve chosen to work a few clear glass beads – this is optional, so I’ll mention which rows I use them on and you can decide what you’d like to do. If you do decide to use beads, thread them onto the yarn before starting the row and then use them as you work across the row. They look best if placed randomly, so just decide for yourself how you’d like to place them.

Wave 1 (worked into the loops between the top row and row 40) Scree (165): Thread on 17 beads, attach yarn and 1 chain, work 1 double crochet into each of the loops across the cushion front.

Wave 2 (worked into the loops between row 40 and row 39) Duck Egg (173): Attach yarn, 1 chain, 1 double crochet into each of the loops across the cushion front.

Wave 3 (worked into the loops between row 39 and row 38) Seasalter (178): Attach yarn, 1 chain, 1 double crochet into each of the loops across the cushion front.


Now to make the raised waves slightly more ‘textured’ we’re going to start adding an increase (so, work two stitches into one of the loops) at the top and bottom of each wave.

Wave 4 (worked into the loops between row 38 and row 37) Maritime (167): Attach yarn, 1 chain, work across the row in double crochet, adding one 2DC Inc (so place two double crochet into one loop) at the top and bottom of each wave.

Wave 5 (worked into the loops between row 37 and row 36) Seasalter (178): Attach yarn, 1 chain, work across the row in double crochet, adding one 2DC Inc (so place two double crochet into one loop) at the top and bottom of each wave.

Wave 6 (worked into the loops between row 36 and row 35) Clay (177): Attach yarn, 1 chain, work across the row in double crochet, adding one increase (so place two double crochet into one loop) at the top and bottom of each wave.

Wave 7 (worked into the loops between row 35 and row 34) Scree (165): Attach yarn, 2 chain, work across the row in half trebles, adding one increase (so place two half treble crochet  into one loop) at the top and bottom of each wave.

Wave 8 (worked into the loops between row 34 and row 33) Duck Egg (173): Add beads to this wave. Attach yarn, 1 chain, work across the row in double crochet, adding one 2DC Inc (so place two double crochet into one loop) at the top and bottom of each wave.

Wave 9 (worked into the loops between row 33 and row 32) Maritime (167):  Attach yarn, 2 chain, work across the row in half trebles, adding one 2 1/2 Trble increase (so place two half treble crochet  into one loop) at the top and bottom of each wave.

Wave 10 (worked into the loops between row 32 and row 31) Duck Egg (173): Attach yarn, 1 chain, work across the row in double crochet, adding one 2DC Inc (so place two double crochet into one loop) at the top and bottom of each wave.

Wave 11 (worked into the loops between row 31 and row 30) Clay (177): Attach yarn, 2 chain, work across the row in half trebles, adding one 2 1/2 Trble increase (so place two half treble crochet  into one loop) at the top and bottom of each wave.

Wave 12 (worked into the loops between row 30 and row 29) Seasalter (178): Add beads to this wave. Attach yarn, 1 chain, work across the row in double crochet, adding one 2DC Inc (so place two double crochet into one loop) at the top and bottom of each wave.

Wave 13 (worked into the loops between row 29 and row 28) Scree (165): Attach yarn, 2 chain, work across the row in half trebles, adding one  1/2 Trble increase (so place two half treble crochet  into one loop) at the top and bottom of each wave.

Wave 14 (worked into the loops between row 28 and row 27) Maritime (167): Attach yarn, 1 chain, work across the row in double crochet, adding one 2DC Inc (so place two double crochet into one loop) at the top and bottom of each wave.


Now, to make the raised waves more pronounced, you will add two increases at the top and bottom of each wave. So, for example if the wave is worked in double crochet, you’ll add  2DC Inc twice at the top and bottom of each wave.

Wave 15 (worked into the loops between row 27 and row 26) Clay (177): Attach yarn, 1 chain, work across the row in double crochet, adding 2 increases at the top and bottom of each wave.

Wave 16 (worked into the loops between row 26 and row 25) Duck Egg (173) Attach yarn, 2 chain, work across the row in half treble crochet, adding 2 increases at the top and bottom of each wave.

Wave 17 (worked into the loops between row 25 and row 24) Maritime (167) Attach yarn 3 chain, work across the row in treble crochet, adding 2 increases at the top and bottom of each wave.

Wave 18(worked into the loops between row 24 and row 23) SeaSalter (178) Attach yarn, 2 chain, work across the row in half treble crochet, adding 2 increases at the top and bottom of each wave.

Wave 19 (worked into the loops between row 23 and row 22) Duck Egg (173) Attach yarn, 1 chain, work across the row in double crochet, adding 2 increases at the top and bottom of each wave.

Wave 20 (worked into the loops between row 22 and row 21) Maritime (167) Attach yarn, 2 chain, work across the row in half treble crochet, adding 2 increases at the top and bottom of each wave.

Wave 21 (worked into the loops between row 21 and row 20) Clay (177)  Attach yarn 3 chain, work across the row in treble crochet, adding 2 increases at the top and bottom of each wave.

Wave 22 (worked into the loops between row 20 and row 19) Scree (165) Add beads on this wave. Attach yarn, 2 chain, work across the row in half treble crochet, adding 2 increases at the top and bottom of each wave.

Wave 23 (worked into the loops between row 19 and row 18) Seasalter (178) Attach yarn, 1 chain, work across the row in double crochet, adding 2 increases at the top and bottom of each wave.

Wave 24(worked into the loops between row 18 and row 17) Duck Egg (173) Attach yarn, 2 chain, work across the row in half treble crochet, adding 2 increases at the top and bottom of each wave.

Wave  25(worked into the loops between row 1 7 and row 16) Maritime (167) Attach yarn 3 chain, work across the row in treble crochet, adding 2 increases at the top and bottom of each wave.

Wave 26(worked into the loops between row 16 and row 15) Seasalter (178) Attach yarn, 2 chain, work across the row in half treble crochet, adding 2 increases at the top and bottom of each wave.

Wave 27 (worked into the loops between row 15 and row 14) Clay (177)Attach yarn, 1 chain, work across the row in double crochet, adding 2 increases at the top and bottom of each wave.

Wave 28 (worked into the loops between row 14 and row 13) Duck Egg (173) Attach yarn, 2 chain, work across the row in half treble crochet, adding 2 increases at the top and bottom of each wave.


Now we’re going to add the breaking waves. This can sound a little tricky, but all you’re going to be doing is working across the waves in double crochet including the increases at the top and bottom of each wave as you have been doing above. Into these waves of double crochet we’ll be adding swirls to create the breaking waves.

There are two different positions along the waves that we’re going to add the swirls that create the breaking waves.

IMG_1629

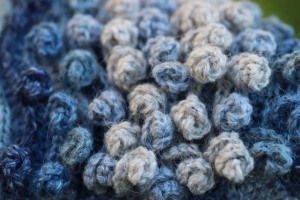
Position 1 is adding a wave in the middle of the straight side of each wave (i.e. between the top and bottom of each wave) as indicated by the ‘1’ in the diagram below.

Position 2 is adding a wave at the top and bottom of each wave, between the increase stitches (i.e. at the top and bottom of each wave) as indicated by the ‘2’ in the diagram below.

position of spirals

Add the spirals in the positions indicated above.

5 Chain swirl: 5 chain, 3DC into 2nd chain from hook, 3 DC into each of the remaining 3 chain.
6 Chain swirl: 6 chain, 3DC into 2nd chain from hook, 3 DC into each of the remaining 4 chain.
8 Chain swirl: 8 chain, 3DC into 2nd chain from hook, 3DC into each of the remaining 6 chain.


Wave 29 (worked into the loops between row 13 and row 12) Seasalter (178) Attach yarn, 1 chain, work across the row in double crochet, adding 2 increases at the top and bottom of each wave, add one 5 chain swirl in each position 1.

Wave  30 (worked into the loops between row 12 and row 11) Maritime (167) Attach yarn, 1 chain, work across the row in double crochet, adding 2 increases at the top and bottom of each wave, add one 5 chain swirl in each position 2.

Wave 31 (worked into the loops between row 11 and row 10) Duck Egg (173) Attach yarn, 1 chain, work across the row in double crochet, adding 2 increases at the top and bottom of each wave, add one 5 chain swirl in each position 1.

Wave 32 (worked into the loops between row 10 and row 9) Scree (165) Attach yarn, 1 chain, work across the row in double crochet, adding 2 increases at the top and bottom of each wave, add one 6 chain swirl in each position 2.

Wave 33 (worked into the loops between row 9 and row 8) Clay (177)Attach yarn, 1 chain, work across the row in double crochet, adding 2 increases at the top and bottom of each wave, add one 6 chain swirl in each position 1 & 2.

Wave 34 (worked into the loops between row 8 and row 7) Scree (165)Attach yarn, 1 chain, work across the row in double crochet, adding 2 increases at the top and bottom of each wave, add one 6 chain swirl in each position 1 & 2.

Wave 35 (worked into the loops between row 7 and row 6) Clay (177)Attach yarn, 1 chain, work across the row in double crochet, adding 2 increases at the top and bottom of each wave, add one 8 chain swirl in each position 1 & 2.

Wave 36 (worked into the loops between row 6 and row 5) Clay (177)Attach yarn, 1 chain, work across the row in double crochet, adding 2 increases at the top and bottom of each wave, add one 8 chain swirl in each position 1 & 2.

Wave 37 (worked into the loops between row 5 and row 4) Scree (165)Attach yarn, 1 chain, work across the row in double crochet, adding 2 increases at the top and bottom of each wave, add one 6 chain swirl in each position 1.

Wave 38 (worked into the loops between row 4 and row 3) Duck Egg (173)Attach yarn, 1 chain, work across the row in double crochet, adding 2 increases at the top and bottom of each wave, add one 6 chain swirl in each position 2.

Wave 39 (worked into the loops between row 3 and row 2) Maritime (167)Attach yarn, 1 chain, work across the row in double crochet, adding 2 increases at the top and bottom of each wave, add one 5 chain swirl in each position 1.

Wave 40 (worked into the loops between row 2 and row 1) Seasalter (178)Attach yarn, 1 chain, work across the row in double crochet, adding 2 increases at the top and bottom of each wave, add one 5 chain swirl in each position 2.


Cushion Back

IMG_1645

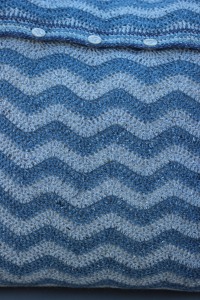
The cushion back is worked in waves of Scree (165) and Maritime (167)

Starting in Scree (165) work 102 chain.

In 5th Chain from hook (the 4 chain count as your first double treble) work 1 treble, then working along the chain work 3 half treble, 4 double crochet, 3 half treble, 1 treble, 1 double treble.

Continue to work across the chain with the pattern *1 double treble, 1 treble, 3 half treble, 4 double crochet, 3 half treble, 1 treble, 1 double treble* repeat from * to * 5 more times.

3 chain, turn work,  1 treble into same stitch, then work 4 treble crochet, two 2 treble crochet decrease, 4 treble crochet, one 2 treble crochet increase.

Continue to work across the row with * one 2 treble crochet increase, 4 treble crochet, two 2 treble crochet decrease, 4 treble crochet, one 2 treble crochet increase* work from * to * 5 more times. Please note that the last 2 treble crochet increase will be worked into the 4th of the initial 4 chain.

Change to Maritime (167)

3 chain, turn work,  1 treble in the same stitch, then work 4 treble crochet, two 2 treble crochet decrease, 4 treble crochet, one 2 treble crochet increase.

Continue to work across the row with * one 2 treble crochet increase, 4 treble crochet, two 2 treble crochet decrease, 4 treble crochet, one 2 treble crochet increase* work from * to * 5 more times. This the back of the work.

Work up the back of the cushion, with 2 rows of each colour until you have 41 rows and keeping the Scree (165) yarn attached work:

1 chain (does not count as first double crochet) and turn work. Work back across the row *2 double crochet, 3 half treble, 1 treble, 2 double treble, 1 treble, 3 half treble, 2 double crochet* repeat from * to * 6 more times. Cut yarn and fasten off.

Next you’ll need to make the button band. The band is worked in stripes of double crochet using up scrap yarn from the front of the cushion – so use up your scraps, working 1 row in each colour.


IMG_1644

Work 101 chain. 1 DC in 2nd Chain from hook, work 1 DC in each chain.

1 chain, turn.

Change colour, 1 DC into each DC from the previous row, 1 chain, turn.
Now to make the button holes:
6DC, 3 chain, skip 3DC, *11 DC, 3 chain, skip 3DC* repeat from * to * 5 more times, 5dc, 1 chain, turn.
Change colour, 1 DC into each DC from the previous row. Each time you come to a button hole, work 3 DC into the 3 chain space, 1 chain, turn.
Change colour, 1 DC into each DC from the previous row, 1 chain, turn.

Change colour to Scree (165)

4 chain (counts as your first double treble), 1 treble, then working along the chain work 3 half treble, 4 double crochet, 3 half treble, 1 treble, 1 double treble.

Continue to work across the chain with the pattern *1 double treble, 1 treble, 3 half treble, 4 double crochet, 3 half treble, 1 treble, 1 double treble* repeat from * to * 5 more times.

Continue to work 2 rows of waves in Maritime, 2 in Scree, 2 in maritime and then the final row in Scree should be worked as follows:

1 chain, turn, work back across the row *2 double crochet, 3 half treble, 1 treble, 2 double treble, 1 treble, 3 half treble, 2 double crochet* repeat from * to * 6 more times. Cut yarn and fasten off.

Making the Cushion

Sew in all loose ends of yarn (this can take some time – settle down with a cup of tea and turn on the radio!)

Lay the main part of the cushion back onto the wrong side of the cushion front and stitch down the sides and across the base.

Lay the smaller part of the cushion back onto the wrong side of the cushion front (so that the button band overlaps with the main part of the cushion back). Stitch the two short sides and across the top.

Stitch on the buttons so that they correspond with the button holes.

Add the cushion pad and you’re done!


main_for_collage_cropped2


Summer Top For Winter!

P1000493

Ooops.  I’ve done it again…..

I’ve done that whole – start a project then ignore it for 4 months – then pick it up and finish it off in a delighted way – only to realise that you won’t actually be able to wear it for another 6 months at least (and in this country, that’s not even a guarantee!) – then sigh.

So, this is the Summer Top For Winter which I finished last week (the middle of a pretty chilly Autumn).  I’m really delighted with how it turned out, albeit with a slight poochyness that I’ll have to wait a while to actually put it on properly.

The pattern for this top is a free one from Trish at Genuine Mud Pie (please see her lovely blog and tutorials here).  I loved the top that she made using this ‘gingko’ fan pattern, and just wanted to make a bolder version for myself.  Take some time to look at her really cute little crochet animals too. She also has another pattern called ‘sideways’, which I’m keeping my beady eyes on….

P1000510

From what I can tell, Trish used a kind of jersey / t-shirt material for the body of her summer top, but I found this blue linen which I wanted to use instead.  The only issue is that the linen doesn’t stretch at all, so I decided to add the slim side panels to allow for a bit of ‘movement’ – just incase I eat too many cakes 🙂 I think the colours work really well together here. The side panels are literally just three rows of Trebles (UK), leaving enough room for the arm hole and a small space at the bottom to create a small ‘flap’ opening which I think finishes the edges really nicely.

P1000509


The blue linen was just a good value piece I bought from my local haberdashers and the yarn is Wendy Supreme Luxury Cotton 4ply in Peppermint (1831) – which I needed two balls of. So altogether, it’s a pretty affordable top to make.

Thanks Trish for the inspiration.

Now, on to warmer stuff 🙂

KB

P1000511

Tiny Crochet Hats

IMG_8256

So the weather has most definitely turned here in the UK.  We’ve had a wonderful, long Summer – but the heating has now gone on and the logs have been delivered to keep the wood burner going over the Winter.  And while it’s a shame to see the cold coming in, it’s also a great excuse to get more yarny loveliness on the go – knowing that it will come in handy pretty soon.

The last couple of days I’ve been playing around with hats.  Mainly because one of my wonderful friends in the states has just had a baby girl and I wanted to send over something handmade and (hopefully) useful!  So, here are the two I came up with.  What do you think?

I really wanted to stay away from pink for some reason – having had a girl and been overwhelmed with the pinkness of all baby girl clothes I suppose.

Here’s the pattern for the dark green hat – and I’ll work on the light green one soon:

This pattern uses UK terms.

IMG_8244

You will need:

  • 30g of your chosen double knitting yarn
  • scrap of alternative colour for flower
  • button
  • 4mm hook
  • tapestry needle for sewing in ends and attaching flower / button

The finished hat measures 14 inches in diameter and is 5.5 inches high – but is very flexible and will ‘grow’ by a good couple of inches in width.  It really is very quick to make – a lovely project for a day when you have some spare time. Effectively we are going to make a flat circle with a starting number of 10 trebles. Here’s the explanation below if you’re not familiar with how this works: (Note: if you want to make the hat bigger, simply carry on increasing until you have a diameter you want, then work rows without increases until the desired height)

Please note, this pattern uses UK crochet terms and the number in brackets at the end of each line is the total number of stitches for that round.

  • chain 4 and join into a loop using a slip stitch.
  • chain 3 (counts as first treble), then make 9 more trebles into the central loop. Slip stitch into the 3rd of the initial 3 chain to join. (10)
  • chain 3 (counts as first treble), make one more treble into same space, then 2 trebles into each stitch from the previous round. Slip stitch into the 3rd of the initial 3 chain to join (20)
  • chain 3, 2 tr into next stitch, then *1 tr into next stitch, 2 tr into next stitch*, repeat  from * to * 8 more times. Slip stitch into the 3rd of the initial 3 chain to join. (30)
  • chain 3, 1 tr in next stitch, 2 tr in next stitch, then *1 tr, 1 tr, 2 tr*, repeat from * to * 8 more times. Slip stitch into the 3rd of the initial 3 chain to join. (40)
  • chain 3, 1 tr in next 2 stitches, 2 tr in next stitch, then *1 tr, 1 tr, 1 tr, 2 tr*, repeat from * to * 8 more times. Slip stitch into the 3rd of the initial 3 chain to join. (50)
  • chain 3, 1 tr in next 3 stitches, 2 tr in next stitch, then *1 tr, 1 tr, 1 tr, 1 tr, 2tr*, repeat from * to * 8 more times. Slip stitch into the 3rd of the initial 3 chain to join. (60)

At this point, my circle measured around 4.5 inches across. From now on, you can work one treble into every stitch and start to work on the height of the hat. From this point onward, I added 10 more rows. Start each round with 3 chain which counts as your first treble, and end each round with a slip stitch into the 3rd of these initial 3 chain.

IMG_8257

To make the edging for the hat, I’ve used crab stitch, which is such a lovely neat way to finish off I think.  Crab stitch is basically a normal double crochet but worked backwards (i.e. in the opposite direction).  Now while I know that can sound confusing, it’s actually very easy once you get your head round it. There’s a great video from All Free Crochet here for instructions on crab stitch.

Once you’ve finished your edging, sew in your ends and make a flower to add a little interest.

IMG_8245

Making the Flower:

  • In the contrasting colour, chain 4 and join into a loop using a slip stitch
  • 1 chain, work 6 double crochet into the loop and join using a slip stitch into the initial chain (6)
  • chain 1 and work 2 double crochet into each stitch from the round below. Slip stitch to join (12)
  • To make the front petals, we are going to work into the front loops only, leaving the back loops free to help form the back petals. (See here for Jo’s explanation on how to identify back and front loops)
  • Slip stitch along to the next stitch, then make 5 trebles into the next stitch along to form your first petal
  • Slip stitch into the next stitch, which will help define the petal
  • *make 5 trebles into the next stitch, then slip stitch into the next*. Continue from * to * until you have made 6 petals and are back to where you started. Join with a slip stitch.
  • Now, to make the back petals change the yarn to the same yarn as you’ve used for the main hat. Turn your flower over and identify the back loops from the round below which you left when you formed the front petals.
  • Working into these back loops, work *1 double crochet in the first back loop, then 2 double crochet in the next back loop*, repeating from * to * 5 more times. Slip stitch to join (18)
  • Now, slip stitch along to the next stitch. Make 7 trebles into the next stitch to form your first petal.
  • Slip stitch into the next two stitches
  • *make 7 trebles into the next stitch, then slip stitch into the next 2*. Continue from * to * until you have made your 6 petals. Join with a slip stitch.

Now you can select a button and sew the flower and button onto the hat.

If you have any questions or comments, please do let me know.

Time to sit back, admire your lovely, cute hat and have a cup of tea!

Hope you enjoy

KB

IMG_8246


Crochet Graph Cushion – Tutorial

Graph_Cover_Mrk2


I’ve long had a fascination with mathematical ‘shapes’ and I had an idea a while ago that I’d love to represent something mathematical in crochet (which I find follows so many of the same mathematical rules).  So, in my head I kept grinning over the idea of a crochet graph, which started to turn into a reality a couple of months ago and eventually this cushion was born. As my week progresses, the need for cake increases and thus the idea was complete.  I LOVE the colours, and I’m so pleased with the finished cushion.  Crochet is just the most versatile medium I love the fact that you can make something that looks so very precise like this cushion or that looks (deceptively) far more random like Jo’s Wiggly cushion here.

Which kind of crochet do you prefer?  If you have any comments or thoughts, do let us know here.

I used an orange palate for this cushion (details of colours used below), but that’s only because it matches the curtains in my living room.  You could easily adjust this concept to any number of graph bars or any colours that suit you.

Lots of lovely colours

Sunset colours

You will need:

  • Drops Muskat – Black (17) – small length for the graph axis
  • Drops Muskat – Light Grey (19) – 200g

then – in order from right to left

  • Drops Muskat – Bordeaux (41) – 50g
  • Drops Muskat – Rust (21) – 50g
  • Drops Muskat – Orange (47) – 50g
  • Drops Muskat – Dark Orange (49) – 50g
  • Drops Muskat – Warm Yellow (51) – 50g
  • Drops Muskat – Vanilla Yellow (30) – 50g
  • Drops Muskat – Light Yellow (07) – 50g
  • 4mm hook
  • cushion pad (I used 45cm square cushion as I wanted it to be nice and firm)

The yarn was all purchased from http://www.woolwarehouse.co.uk/

This pattern is written using UK crochet terms.

Tension: working in rows of double crochet with a 4mm hook 5cm = 12 stitches wide x 12 stitches high – My stitches do tend to be quite tight, so do check your tension before you start. This pattern makes a cushion which is 40cm square.

Making the graph

I made the graph square in double crochet, using the diagram below as a guide for the colour change. Each square of the diagram represents 3DC wide by 3DC high. You really could make the graph bars whatever height you like, but I like the ‘stepping down’ look I’ve created.

Each square represents a 3DC square

Each square represents a 3DC square

The graph panel is going to be 72 stitches wide by 72 rows high. However, in order to make the colour change as easy as possible, we are going to work the whole panel sideways from the right of the chart to the left. That way, we only need to concentrate on one graph bar colour at a time.

To start, work a chain of 73 stitches long in the Light Grey yarn. This will be the right hand edge of the diagram above.

Starting in the 2nd chain from the hook, work 1 double crochet in each chain along.
At the end of the row, work 1 chain and turn.

*1 DC in each of the 72 DC from the previous row, 1ch, turn* work from * to * 5 times so that you have 6 DC rows in Light Grey.

On the next row, we are going to introduce our first graph bar.

DC 5 in the Light Grey, on the 6th DC, yarn over and hook a loop through (see 1. below), then switch to your new graph bar colour (see 2. below), using the new colour to complete the stitch (see 3 below).

You will need to carry along the Light Grey yarn that you’re not using, forming the double crochet stitches over the top of it (see 4. below). This has the advantage of making both the front and the back of the work very neat, and means there are significantly less joins to make. To be sure that the work is an even texture, pull the yarn that you are carrying tight as you go.  (There are more detailed pictures of how to do this colour change on Jo’s Monster Maze Cushion here)

1.

1.

2.

2.

3.

3.

4.

4.


I’ve left an area of Light Grey at the bottom of my graph, so that the axis lines and labels have some space.  However, I chose not to carry the bar graph colour through the grey, instead leaving it ‘hanging’ on the last stitch and picking it back up again (using the method above) when I got back up to the right stitch. REMEMBER, you need to change the colour on the stitch BEFORE the new colour block starts (see 1. below)!

IMG_1579

Leave the yarn for the block colour at the point that you change to the Light Grey (see 2. below), then carry on in the Light Grey to the end of the row (see 3. below). Chain up and turn your work, making DC’s up to the stitch before you change back to your colour (see 4. below, where you can also see the Orange yarn waiting for you!). Use the block colour to finish the stitch before the block starts, simply picking it up from where it’s waiting (see 5. below). Then just carry on using the Orange yarn and carrying the grey with you as before (see 6. below).

1.

1.

2.

2.

3.

3.

4.

4.

5.

5.

6.

6.


Carry on using this method to create all of the other graph bars, leaving 3 rows of Light Grey inbetween each one, and six rows to finish off after the last graph bar colour.  Once you are done, crochet a row of DC all the way round the panel to create a frame and neaten it all up. I then carried on creating a frame in DC using two rows of Orange, one row of Light Grey and two rows of Warm Yellow.

To finish the front, you now simply need to add in the axis lines and sew on the labels.

The axis lines are made in Black by making stitches onto the top of your work. Hold the black yarn at the back of your work, and insert your hook and pull through a loop, then move your hook to the next stitch along, insert and pull through another loop, continuing to pull it through the first (effectively creating a line of slip stitches). Work this line to the correct height, then using a tapestry needle, create the arrow at the end and fasten off.

IMG_1572

The labels I’ve used here were from Nicollie, who makes some wonderful hand made leather tags, bracelets (with crochet hooks attached!!) and keyrings and was happy to accommodate my wording requests. Please check our her shop here!

Making the back of the cushion

IMG_1570

So, this is where the fun starts 🙂 The only rule is to work a panel which is 72 DC wide, by 72 rows high.  I really just had fun and changed colours randomly, bearing in mind that I needed to keep enough of the ‘framing’ colours (Ornage, Light Grey, Warm Yellow) to complete the frame on the back to match the front.

Once the back panel is made add the same border as you did the front panel (two rows of DC Orange, one row of Light Grey and two rows of Warm Yellow). Then simply lay the two sides together and slip stitch around the edge, inserting your cushion pad once you have three sides attached.

IMG_1571

Slip Stitch the front to the back

Now sit back, enjoy your lovely work and have a well deserved cup of tea!

IMG_1580

Autumn Leaf Crochet Mat

IMG_8215

I’m totally fascinated by the wonderfully intricate crochet patterns made with tiny hooks and beautifully fine cottons. Crochet is such a versatile craft, don’t you think?  I generally tend to work with 4ply and larger yarns though, although I’m working on a beautiful lightweight edging in a pineapple pattern a the moment (more of this soon :))!

With that in mind, I was spending a happy while (….hour or so….) pottering through pinterest (it really does suck you in doesn’t it 🙂 ), when I saw this Leaf Coaster from Sandra Pontos’ Blog (here):


Leaf Coaster from Sandra Pontos Blog

Leaf Coaster from Sandra Pontos Blog


I just love these – they’re so very pretty and delicate and look terribly simple as a finished article, but you can tell how much work (and counting) has gone into each one.  Originally, I was thinking about making these coasters in a fabulous neon orange cotton which I have hiding in my yarn stash, but then it hit me that I should try ‘upsizing’ the design instead. And so, the giant leaf mat was born…..

IMG_8216


I’m sure you’ve all come across this t-shirt yarn before?  This one is from Hoooked and is called Zpagetti.  (Have a look at their website here if you haven’t already – there are some amazing colour ways) It’s really wonderful to work with, because it has such a pleasing ‘springy’ nature….although to be honest, it’s a really good work out for your arms too. And because of it’s springy nature, it really does need proper blocking too…which I did using a cork board and some pins, soaking the whole leaf and then letting it dry in the sun.

IMG_8210

The pattern (a chart you can find in the blog mentioned above) used up about half a cone of Zpagetti on a 12mm hook.  I generally prefer using bamboo hooks, but you can buy a fab looking bright pink plastic hook on the Hoooked website if you’re in need of one.  By the way, this yarn is also excellent for making floor cushions.  This is one I made about a year ago for my daughter…there’s a free pattern in for it here.

IMG_1655

Because it’s such chunky yarn, the leaf only took me a couple of days to make – I love it when you can picture something in your mind and then have it sitting there in front of you after just a few happy hours of work.

So…the end result is not quite as lovely and neat as the little coasters, but I think it’s great.  Made in a brighter colour this could really make some fun outdoor seat pads for kids, or maybe even a bath mat.

Enjoy!

KB


Monster Maze Crochet Cushion Tutorial

monster_maze_cover_III

I made this Monster Maze cushion for my boys.  I used Drops Cotton Light which is perfect for the summer and has worked up with a nice firm texture which is great for a kids project. The aim is for little fingers to be able to trace the maze around the cushion – taking care to avoid the lurking monsters!

We’d love to know what you think! Leave us a comment here.

You Will Need:

  • Drops Cotton Light – Jeans Blue (26) 300g
  • Drops Cotton Light – Green (11) 200g
  • Drops Cotton Light – Yellow (28) 50g
  • 4.5mm & 4mm Hooks
  • 10 Buttons to decorate (more details in how I made these below).
  • A 45 x 45cm Cushion Pad.

The yarn was all purchased from http://www.woolwarehouse.co.uk/

This pattern is written using UK crochet terms.

Tension: Working in rows of double crochet with a 4.5mm hook 5cm = 10 stitches wide by 10 rows high. If your tension is different from this, change your hook size to suit.

The Maze Panel

Maze_Grid_Pattern

Each square in the grid represents one double crochet.

The maze panel is worked in rows of double crochet, using a 4.5mm hook

The panel is going to be 72 stitches wide by 72 rows high. To start, work a chain of 73 stitches long in the Jeans Blue yarn.

Starting in the 2nd chain from the hook, work 1 double crochet in each chain.
At the end of the row, work 1 chain and turn.

*1 DC in each of the 72 DC from the previous row, 1ch, turn* work from * to * 3 times so that you have 4 rows in the Jeans Blue.

You may notice that I’m not treating the 1ch as the first double crochet in the row – this is just because I don’t like working this way, I always find it tricky to work into the chain stitch and so I’ve now decided to throw caution to the wind and not bother! I simply do a chain at the end of each row to turn the work and get me into the right place, then work a double crochet into each double crochet from the previous row. I know it’s not how it’s done ‘properly’ but I find it easier, so it’s the method I use 🙂

You now need to start working from the grid using both the Jeans blue and the Green yarn. Each square on the grid represents 1 DC stitch.

How to Change Colour

Changing colour when working in double crochet is very easy – you just need to remember a couple of things. The first thing is that the stitch BEFORE the new colour is important – work your double crochet as normal (hook into stitch, yarn over hook and bring through a loop) but change colour now, so that you do the final yarn over hook and pull through in the new colour.

P1030078

Work the first half of the stitch as normal

P1030079

This is my last green double crochet before I swap to blue. I’ve inserted the hook into the stitch below and pulled through one loop of the green – giving me two green loops on the hook

P1030080

Now rather than looping round the green yarn as I would on a ‘normal’ stitch, to change colours I hook the blue yarn.

P1030081

Now you’ll finish the stitch with a blue loop on your hook and you’ll get a neat colour change.

The second thing for this pattern is that I have carried along the yarn colour that I’m not using, forming the double crochet stitches over the top of the yarn colour that isn’t in use. This has the advantage of making both the front and the back of the work very neat, and adding extra weight to the finished panel. To make sure that the work is an even texture, make sure that yarn that you are carrying is kept taut.

To carry the yarn along, when the hook goes into the stitch, the yarn to be carried needs to be laying over the hook.

To carry the yarn along, when the hook goes into the stitch, the yarn to be carried needs to be laying over the hook.

Work the double crochet as usual.

Work the double crochet as usual.

The green double crochet stitches are worked as normal and the blue yarn is carried along ready for when you need it.

The green double crochet stitches are worked as normal and the blue yarn is carried along ready for when you need it.

Using the grid, work across the even number rows from right to left and the odd number rows from left to right.

As you are carrying the yarn colour you’re not using with you, you’ll find that when you reach the end of a row you have the blue yarn that is in use and the green yarn too. Just make 1 chain, turn the work and then continue to work in the blue, encasing the green yarn in the stitches as you work.

Continue to work up the grid, finishing with the last 4 rows in blue – there is no need to carry the green yarn through these last rows as you will not need it again.

P1030082

Edging the maze pattern.

To edge the maze pattern in yellow, using a 4mm hook, hold the yellow wool at the back of the panel, insert the hook and pull through a loop, insert the hook again 1 stitch further along and pull through a second loop. Pull the second loop through the first one and continue.

Well done – you’ve finished the difficult part!

The Cushion Back

IMG_1359

Simple stripes for the cushion back.

The cushion back is worked in stripes of double crochet, to save having to sew in lots of ends, carry the colours up the side of the panel – they’ll be hidden when you work the edging round.

P1030109

Carrying the yarn neatly up the side of the back panel saves having to sew in lots of ends!

73 Ch, DC into 2nd Chain from hook, work 1 DC into each chain.

1CH, turn work, 72 DC

Change colour to green yarn.

*1CH, turn work, 72 DC* work from *t0* 2 times

Chaing colur to blue yarn.

*1CH, turn work, 72 DC* work from *t0* 2 times

Continue to work rows of stripes until you have 72 rows.

The Edging

The edging is worked in the same way for both the front and back panels.

With the right side of the panel facing you, attach the blue yarn at any point along the side of the panel and work 1 CH.  Along the sides, work 1 DC into each row and at the top and bottom work 1 DC into each DC from the panel. At every corner work 2CH. Slip stitch into initial CH to finish the round.

P1030110

First round of edging along the side of the back panel

Attach green yarn, 1 CH and continue to work 1DC into each DC from the previous round. At the corners work 1DC, 2CH, 1DC into the 2CH space. Finish round with a slip stitch into the initial 1 CH

Attach Blue yarn and continue to work 4 more rows of edging in the same way as above – 1DC in each DC from the previous round with 1DC, 2CH, 1DC into each 2 CH corner space. Finish round with a slip stitch into the initial chain of that round and fasten off yarn.

The yellow outline is worked in the same way as on the front panel. Work the yellow following the line that marks the edge of the panel and the start of the border.

Make the border in the same way for both the front and back panel.

IMG_1364

Add the yellow where the panel meets the edging.

Add the Buttons!

I decided that to make my maze cushion more fun, I should add monster buttons to lurk in the dead ends (thanks to Karey for that inspiration!). Being me, I decided to make buttons out of Fimo (polymer clay), but you could buy pre-made buttons (try somewhere like this http://www.beadandbuttoncompany.co.uk/) or just go for regular brightly coloured buttons.

P1030112

Fimo monster buttons!

I went for an arrow button for the top left to mark the start, a chequered flag for the finish and little green and blue beasties for along the way. I normally only play with Fimo with my kids, so I’m certainly lacking some skills, but the results are quite cute. From what I’ve read on the web, it’s fine to machine wash fimo buttons – but if you are in any doubt, remove them before washing.

To Finish

To finish off the cushion, sew in all the ends and sew the buttons into place.

With right sides facing out, lay the cushion front onto the back. Attach the yarn and line up the edges, holding the front panel facing you. DC to fasten the two panels together – lining up the stitches and catching the back loop of the stitch from the front panel and the front loop of the corresponding stitch on the back panel.

I decided to attach the front to the back using double crochet and as I’m using a polyester cushion pad if it ever needs to go into the wash I can either just pull back the row of DC that joins the front to the back or be lazy (which has been known in the past) and put the entire thing, cover and pad into the washing machine.

IMG_1363

The row of double crochet makes a nice neat join.

Well done – you’re all finished, make yourself a cup of tea and sit back to enjoy what you’ve created.

We’d love to hear what you think, or if you need any pattern support please do leave a comment here.

IMG_1361